Showing posts with label DIY. Show all posts

Chalk Countdown Charger


Hello! How has your day been? Did you have to work today? I didn't! YAY! The kiddos were all off too. I have spend the day cooking, baking and crafting and I can't wait to share my creations with you so don't forget to follow me on BLOGLOVIN to see what I come up with next! My husband took my car in to be inspected and licence today before having to work tonight and tomorrow BUT it is his LAST week as a Patrol officer! He starts Detectives on Monday, December 1! We are pretty excited about it!  But anyway on to the second craft from my Girls Crafting Day this past Saturday with my lovely friend Cheri in her new house!

To make this craft you will need:
Your choice of large plastic charger
Chalkboard paint
Foam paintbrush
Letter Stickers
Ribbon  and Bow Tying Skills or Pre-made Bow
Adhesive Rhinestones (optional)
Plate Stand (optional)


First lay down newspaper or plastic bags to protect your surface. Be sure to mix chalkboard paint before starting,


Then paint the center of your charger with the chalkboard paint. We found dabbing it on thick for the first coat worked better than painting with strokes. Then go back and dab in missed areas. I then gave mine a second coat - it dries very nice and smooth!


Next I added a strip of adhesive red rhinestones around the center of the charger. I wanted mine to be really blinged out! It was super easy I just peeled off the strips of rhinestones and lined them up! I love how it added to the finished project and brought it all together!


After the paint dries add your letter stickers starting with "Christmas" and then centering the other words above it. You can see where I messed up and had to repaint! I hate centering letters! You can see this in my scrapbook layouts because I almost always but letter stickers for titles on a straight edge or purposefully crooked!


Finally use ribbon to make a bow if you are capable of doing so....or buy a pre-made bow (like me) and attach with hot glue gun!


And there you have it! A custom easy countdown charger! I love how mine looks and it will look great with my red, white, and silver, Candy Cane themed decor!


Here is Cheri's almost finished. I love hers too! She went with a more rustic burlap look but it is equally fabulous!

What do you think? Thanks for looking! Feel free to pin!
Find Joy in the Journey,
Tess


Wine Bottle Santas


How is your week going? Mine is GREAT! Only two work days this week! I tried a Chestnut Praline Latte at Starbucks this morning (because they were out of Salted Caramel AND Caramel Brulee) and it was pretty good!I am ready to start cooking the next few days for Thanksgiving. I don't have to do the whole meal because we are going to my Mom's Friday for Thanksgiving it will be our first Thanksgiving their since Dad died three years ago. Thanksgiving is so hard for me with the memories of Dad attached to it. We will g0 visit his grave site too. Anyway didn't mean to be a downer! Let's check out the craft I have to share with you today! This past weekend I got to visit my dear friend Cheri at her beautiful new house! We planned two pinterest crafts and each bought materials for one and then shared! First we chose these wine bottle Santas. I am sharing it first so you can start saving wine bottles!

For this project you will need:
Wine Bottles with the labels removed.
Red Spray paint - I LOVE the Red Shimmery one we used (from Hobby Lobby)
a dowel (to hold the bottles when painting)
Jute or Twine
Thick Black Ribbon
Small Crystals ( the strips work best!)
Large Crystals
Jingle Bells (optional)


First - Spray paint the bottles outside (on a NON-windy day preferably) using the dowel. Let dry.


Then wrap Jute or Twine around the top and bottom securing with hot glue. I found the bottom to be tricky and need hot glue all the way around the bottom first layer of jute. This really helps hold the base and keep it from coming off of the bottom.


Next Cut a piece of ribbon long enough to go around the bottle and glue down.


Finally add the bling "buckle" outline, and bling buttons.

You can also add a couple jingle bells if you would like. I left the jute off of the middle bottle and plan to leave off the buttons and maybe add jingle bells to it or black bling buttons. 


What do you think?!?!? I love how they turned out! These would be cute on a buffet or mantle. You could also use them as candle stick holders!

Find Joy in the Journey,
Tess

10 Things to do with a pumpkin besides carve it


We went to Schweizer's Orchard's pumpkin patch last Saturday and had a great time!!! We picked our own pumpkins and got some apples, squash, and gourds. We saw friends of ours and the boys saw friends from Savannah. Blake is friends with the Orchard owner's son, Cole. He was so excited that Cole was at Cole's Orchard (which is what he calls it).  See the full post HERE.

Anyway, Andrew always does the carving of the pumpkins, usually while I am at Parent Teacher Conferences so I don't get many pictures. It's their thing. He has carved some amazing pumpkins over the years! Yoda, Darth Vader, a monkey, owl, elephant, creepy skeleton face, elephant, vampire, werewolf and more! This year he's going to try using the drill for Ava's Tinkerbell pumpkin.

I prefer decorating the foam pumpkins that will last from year to year! So here are things to do with a pumpkin besides carve it. As usual I try to share with you ideas that are doable with supplies that are relatively easy to obtain.

1. Washi Tape
No Carve Washi Tape Pumpkin Craft | #washittape #pumpkin #idea
I just love these little pumpkins from Fox Hollow Cottage. How easy are they? This is something you could even do with the kiddos for a class party or kids Halloween party. Who doesn't have tons of washi tape laying around? I know I do!

2. Buttons and a Bow
Pumpkin Decorating
I love this button pumpkin!! I searched forever but could never find the original source. I would use tiny pins to pin on the buttons then some paint to paint the stem, and some wired ribbon for a bow. This would work on a real or foam pumpkin.

3. Ribbon
I love the idea of using ribbon on a pumpkin! Probably cause I love ribbon! This is one I did last year. I used pins to attach the ribbon. I love it! So easy!

4. Use Lace or Patterned Hose!


Isn't this lace pumpkin from Dot Girl Blog chic? Super easy too! I can also see using patterned panty hose or tights! Top with a bow to finish it off.

5. Crayon Drip Art
crayon drip large
I love the creativity of this Crayon Drip Art pumpkin from The Swell Designer. How fun is this? There are so many possibilities! You could mask off parts and then remove the mask to leave parts white. Simple fun and easy!

6. Spray Paint

I love how Emily from 52 Mantels uses Vinyl which you can cut by hand or with your Silhouette Cameo then spray paints this cute polka-dot monogram pumpkin. Two things I love polka-dots and initials!!! I am seeing chevrons, names, all kinds of ideas.

7. Glitter it!


Who doesn't love glitter? (my husband, school custodians but aside from them) I love this large Initial glitter pumpkin my Meredith at UnOriginal Mom. She used double sided sticky paper from Silhouette. You could also use large glue dots to make glitter polka dots or go old school with a taped off design and glue with glitter.

8. Rhinestones

I absolutely love this Rhinestone Initial Pumpkin I created (shameless plug I know!) but really it was SO easy! I found the S out of rhinestones pre-made at Micahels Craft store then created the oval design around it with another sheet of different sized rhinestones. See THIS post for full details.

9. Wrap it with Yarn
I love these cozy yarn wrapped pumpkins from Everything Under the Moon. She used foam pumpkins and I love the yarn she chose.

10. Modge podge leaves or other items


This is so fun! I am already thinking of other things that I could decoupage to a pumpkin! This picture comes from Decorating Your Small Space.

Find Joy in the Journey,
Tess

Fall Door Decor Round Up


Today I am sharing with you my favorite door decorations from the webosphere! I think all of these are totally cute and doable! What I mean by that is when I go searching for a door decoration project or any new project it has to be something that I can reasonably do in an afternoon with supplies I can actually find here in the Midwest! I wanted to share decor that you can actually do even if you are not that "krafty".

First up this adorable rustic burlap pumpkin from Top This Top That.


I love the leaves and wood stem! I also love that it is a pumpkin that can start in September and last through November!!!! This would NOT be that hard. The base, and burlap are readily available at craft stores, as are the fake leaves. The branch should be easy to find with a walk in the woods or a friend who cuts firewood. If you live in a area with no trees you can totally leave it off!

Next, these wood tags from That's My Letter.


I love that it's not a wreath, I love the simplicity, and I love how versatile it can be super easy to change up, put another saying on the other side and simply flip over, add flowers, leaves or a bow and completely change the look! This is probably the most difficult of the door decorations I am sharing today. I am super lucky to have a very handy hubby who can and does cut things like this for me but I am sure you could find something similar at a craft store! As for the lettering I would use my cameo and vinyl but the original creator creates it by hand!

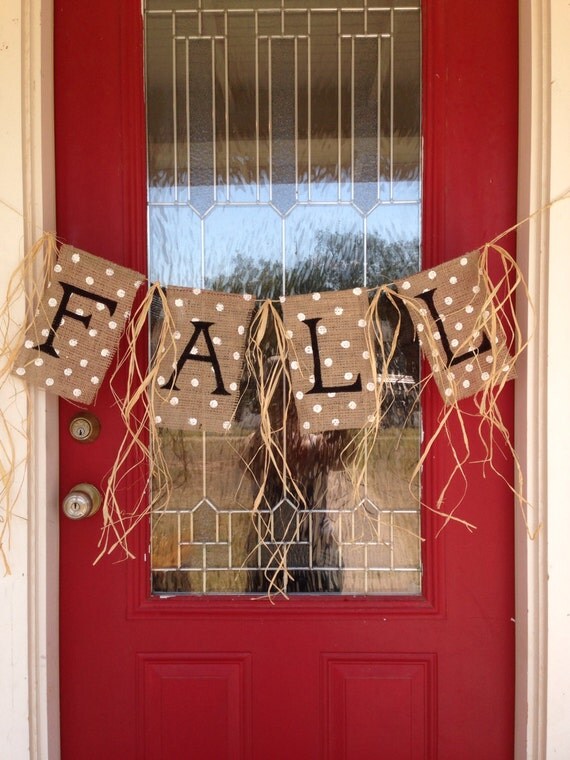
Additionally, this burlap banner from Stackhouse LA etsy shop.

Fall Burlap Banner

I love banners so of course I love this! And it would be SO easy to make! Just paint, burlap and raffia all available at craft stores even Wal-Mart!

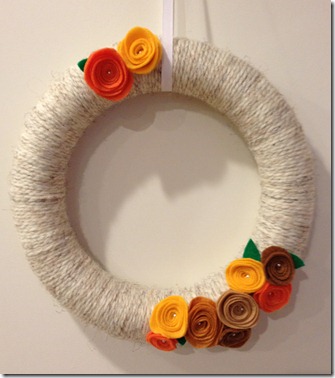
And  I love this Fall Yarn wreath from Mama Bub.

Fall_Yarn_Wreath

I think yarn wreaths are perfect for fall!!! To me they are everything I love about fall! Soft warm sweaters and beautiful fall colors! What's not to love?!?! And there are so many options! This is also super easy to make! The felt flowers can be time consuming (I have a friend who once made a wreath entirely out of them! She is amazing and a little crazy) but you could totally use fake flowers for a simpler less time consuming wreath!

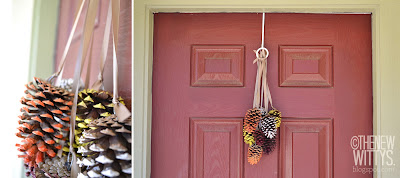
Next this pine cone door decoration from The New Witty's.


Things to love about this - 1)Finding and painting pine cones as a family what fun! 2) Simple easy decor that will last all fall! 3) easily adaptable for other seasons loving this idea for Winter! I see blues and glitter! 4) So versatile with so many options! If you like in an area without pine cones they sell them at craft stores, making this a super easy fall decoration!

This Fall Monogram Wreath from Pearls, Handcuffs, and Happy Hour has so much to love for fall! (and btw I just love her blog name!)

[wreath2%255B5%255D.jpg]

I love monograms even though mine is so tricky! You could easily make more than one wreath and simply move the jute wrapped letter from wreath to wreath to change the seasons! I also love the fabric flowers which are so easy and the grapevine wreath. There are also so many options for the bow! These grapevine wreaths are easy to find at craft stores and even the Dollar Tree! The fabric, jute, and letter are available at craft stores!

And finally, I had to include this Flannel and Denim wreath by the 36th Avenue.


I love this wreath for many reasons but mostly because I have a stack of flannel shirts and old denim sitting in a pile waiting to be made into a quilt. One is going to be made into this wreath very soon. They belonged to the most amazing man I have ever known and I can't wait to make this wreath! It will be sad but healing. I love the concept of this wreath because again it reminds me of some of the best parts of fall! This wreath can be made from old clothing or clothing purchased at thrift stores for very little!

Thanks for looking today!

Which one is your favorite?

What's currently hanging on your door?

Stay tuned as at least two of these are on my immediate to do list!


Find Joy in the Journey,
Tess

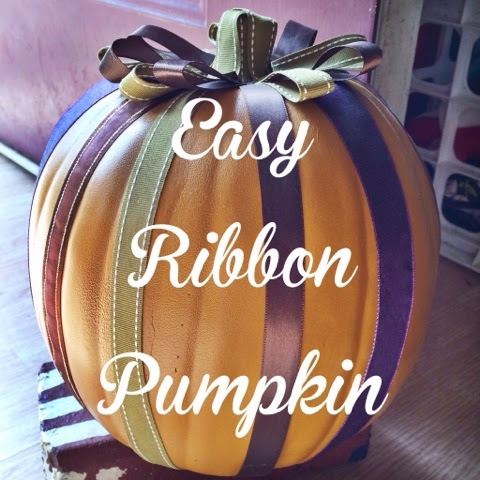
Ribbon Pumpkin


Today I have a super easy ribbon pumpkin tutorial for you!

All you need is:
Scrap Ribbon
Pins, Hot Glue, or Double Sided Tape
1 pumpkin real or foam


Start by cutting your lengths of ribbon - you can do whatever color combination you wish! I chose fall colors so that it could set out from September till Thanksgiving!

You can use any kind of ribbon, thin, thick, sheet etc.


Then you will start at the bottom and adhere your ribbon - you can see here I used pins and then pinned again at the top. Using hot glue you could do the same or put the glue the whole length of the pumpkin. Double sided tape you would put the whole length. I must say my kids have played with this and it has really held up well!


For the top I decided to cover the stem and make it decorative. I just looped and pinned some ribbon all the way around the stem which covers up the pins and ends of the stem ribbon. Yes you can see it if you are looking down on it but that is the only time and who is going to do that if it is setting on a shelf or mantel?


The end product! I how it turned out and it took maybe 30 minutes! And if you pin it you can always change it if you want the next year. What do you think?

Find Joy in the Journey, 
Tess

Make it Monday - DIY personalized coffee mugs


 I got crafty this weekend! YAY!
I had seen these cute little mugs on pinterest before Christmas and finally got around to making them! lol

They were super duper easy though my handwriting could use some work! oh well all part of the charm I guess!
All you need is a blank mug and a sharpie! I used an oil based paint sharpie but I have read that regular ones work also.

 Just write what you want on the mugs. I free handed mine but you could also use a stencil or create one using vinyl and your cameo or other cutting machine. Then bake in a 350 degree oven for 15 minutes!
Viola I will let you know if they come off in the dishwasher - although I might not mind the cream coming off so I could write it straight! sheesh!

Linking up with

createinspire1

Ninth Street Notions

*Live*Laugh*Love*Create*
 signature photo signature.jpg

Who is the Krafty Mama?


Hi I'm the Krafty one! :) I'm the Queen to 2 little knights and a sweet princess. I married my knight in shining armor (kevlar) over 8 years ago and I am a REAL mom, wife and substitute teacher trying to be the best I can be! I love "krafting" but tend to buy more supplies than I actually use. I love make up, nail polish, hair products and fashion but have been known to leave the house in sweats a messy bun and no make up! I love to cook and bake but am guilty of feeding my kids McDonalds in a pinch. I love direct sales and have joined too many to mention! I would love to get to know you!

Keep In Touch

Subscribe via Email

Enter your email address:

Grab My Button!

I would love it if you would join me on Influenster!

ExpressionsVinyl Logo
Vera Bradley Designs, Inc.
Common Creative Licence Tessa Miller-Schweder. Powered by Blogger.
workshop

I was a Featured Blogger!!!!

My TPT Shop

GroopDealz.com
Custom Invitations and Cards
Hotwire US
FREE $10 Giftcard, FREE Shipping, and Exclusive Holiday LEGO Set. Only Nov 29th - Dec 2nd
Julep Beauty Inc.
JuiceBeauty.com FREE SHIPPING