Showing posts with label pumpkin. Show all posts

Easy Rhinestone Pumpkin


Today I have the easiest, blingiest, chic pumpkin ever! 

Ok so that might be a stretch but it is easy, cheap and I think it's chic!

To make you will need:
Foam Pumpkin
Rhinestone Initial or Large Initial printed out to use as a guide
Various sizes of Rhinestones


So I got the foam pumpkin at Michael's for 50% off, and the Rhinestone letter and rhinestones were like 60% off! SCORE! That brings this project in around $10!


First position the initial in the center of the pumpkin. Then place it on, you can move it a little bit if you don't push down, but once you do it's stuck pretty well!

I then drew an oval (ok Andrew drew an oval, I would have taken forever perfecting it).


And I placed the largest rhinestones at the top, bottom, right and left. Then added the next size smaller rhinestones equal distance between those.


I kept going until the oval was filled then added some accents to the largest rhinestones.


I really like how it turned out! Here it is with our fall display out front.


Super fun and easy right? What ideas do you have for decorating a foam pumpkin?

Linking up with 


Find Joy in the Journey,
Tess
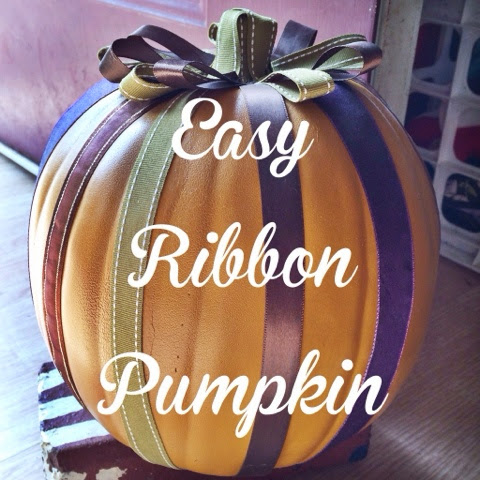
Ribbon Pumpkin


Today I have a super easy ribbon pumpkin tutorial for you!

All you need is:
Scrap Ribbon
Pins, Hot Glue, or Double Sided Tape
1 pumpkin real or foam


Start by cutting your lengths of ribbon - you can do whatever color combination you wish! I chose fall colors so that it could set out from September till Thanksgiving!

You can use any kind of ribbon, thin, thick, sheet etc.


Then you will start at the bottom and adhere your ribbon - you can see here I used pins and then pinned again at the top. Using hot glue you could do the same or put the glue the whole length of the pumpkin. Double sided tape you would put the whole length. I must say my kids have played with this and it has really held up well!


For the top I decided to cover the stem and make it decorative. I just looped and pinned some ribbon all the way around the stem which covers up the pins and ends of the stem ribbon. Yes you can see it if you are looking down on it but that is the only time and who is going to do that if it is setting on a shelf or mantel?


The end product! I how it turned out and it took maybe 30 minutes! And if you pin it you can always change it if you want the next year. What do you think?

Find Joy in the Journey, 
Tess

Who is the Krafty Mama?


Hi I'm the Krafty one! :) I'm the Queen to 2 little knights and a sweet princess. I married my knight in shining armor (kevlar) over 8 years ago and I am a REAL mom, wife and substitute teacher trying to be the best I can be! I love "krafting" but tend to buy more supplies than I actually use. I love make up, nail polish, hair products and fashion but have been known to leave the house in sweats a messy bun and no make up! I love to cook and bake but am guilty of feeding my kids McDonalds in a pinch. I love direct sales and have joined too many to mention! I would love to get to know you!

Keep In Touch

Subscribe via Email

Enter your email address:

Grab My Button!

I would love it if you would join me on Influenster!

ExpressionsVinyl Logo
Vera Bradley Designs, Inc.
Common Creative Licence Tessa Miller-Schweder. Powered by Blogger.
workshop

I was a Featured Blogger!!!!

My TPT Shop

GroopDealz.com
Custom Invitations and Cards
Hotwire US
FREE $10 Giftcard, FREE Shipping, and Exclusive Holiday LEGO Set. Only Nov 29th - Dec 2nd
Julep Beauty Inc.
JuiceBeauty.com FREE SHIPPING